background

Monday, August 13, 2012

Next Re-Stylin' Project - Our Master Closet

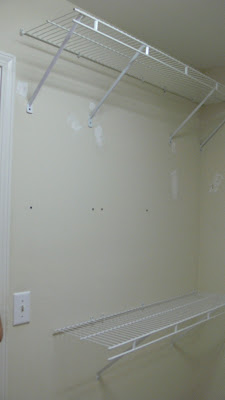
Hey there! How was everyone's weekend??  I'm sure it was great! :)  I started working on a new project...and it's something I should have started a long time ago (because we have lived here for almost 2 years).  My name is Kristine and I have a confession to make...My husband and I have a farely large master closet in our bathroom and we don't utilize it.  At all.  I know, I know.  Don't hate me.  I guess I should explain.  We "use" the closet but not the way we should.  It's more of a place to dump stuff.  I mean, I have always told myself  "Self, you are going to clean this closet out and really utilize it." I never got around to it, until now.  I think I put it off so long because it's pretty scary.  I didn't even take a before picture because I was to embarassed to show you! But the previous owners did a real number on it.  There are so many scuffs on the walls, holes, old nails, old anchors, etc.  And the way they have the wire shelves up on the wall were allllll wrong.  So I took everything down and started from scratch.


The picture above is the entrance into the closet and the shelves you see are my side of the closest (the longest & biggest part) :)


The picture above is Scott's side of the closet.  It's perfect for him.


This is our new laundry system.  It's technically for shoes but since being a stay at home mom now, I have decided to down size my shoes...I know, its crazy.  Here are some of them below (not including all my boots..)


So I am putting some in storage because they are considered my "work" shoes and some are going to Goodwill.  Anyways, I am going to use three sections of that shelving for our whites, darks and towels and sheets.  Luckily the baskets fit perfectly onto the racks and this new laundry system has been working out so well for us so far.

Just for kicks, look at all the awful scuffs and mess all over the wall that we are working with...


YUCK.  Anywhoo -When Sherwin Williams was having their 40% off sale a month ago, we decided to go ahead and buy some paint for the closet and we are painting it PINK.  I am SO excited.  Scott was totally ok with anything I wanted.  I really want it to feel girly and feminine and I am so lucky that I have a husband who totally doesn't care.  We have recently decided that we are going to invest in some nice shelving system from Home Depot.  We are going to hopefully buy them tomorrow. :)

So far we have pulled all the shelving off, re-patched allllllllllllllllll the holes, sanded them down, painted all the trim a crisp white and I have now started painting!  We are on a roll!  Now we need to finish painting and order our new shelving system! Yay!  Stay tuned!

~Kristine

Thursday, August 9, 2012

A Chocolatey Recipe

Hey, Hey, Hey!  How's everyone doing?  Hopefully everyone has been watching these amazing Olympics.  I don't know what I'm going to watch when it's over...What did I use to watch before it started??  Who knows.  Anyways, I wanted to bring to you an amazing and yummy and EASY recipe that my awesome mother in law brought to me back in December.  It is seriously addicting, so that's your warning.  You only need THREE ingredients.  That's it!!  And they are:

 
1. Box of Golden Grahams cereal
2. Peanuts
3. 1 whole bag of chocolate chips

Put the chocolate chips in a bowl (that can go in a microwave) and heat them up until they are nice and melted.  Stir it up real good.  Now add 4 cups of golden grahams into the bowl with the melted chocolate chips (or more if you want) and add in 1 cup of peanuts (or more or less-whatever you want!) And just mix it all up and make sure you get all the golden grahams all nice and coated with the chocolate.


Here's what it looks like after all mixed up.  Now get a cookie sheet and put some wax paper on it.  Spread out your mixture on the wax paper.


Place the cookie sheet in the refrigerator for about an hour so it hardens.  Take it out after an hour or so and start breaking it up into little pieces and place into a ziplock bag.  Voila!  You're done!


The thing I love about this recipe is that you can change it to anything that you like.  You can use dark chocolate or butterscotch chips.  You can use walnuts or pecans or no nuts at all.  It's your choice!

Hope you like.  I love this and it's so good when it's nice and cold.

~Kristine

Thursday, July 26, 2012

Guest bathroom - Done!

Hello everyone!  I know I said I would have the final product posted yesterday, BUT I had a little emergency with my wee little Lola & was taken away from the project for a bit.  Don't worry, she is fine :)

We finished up the bathroom this morning.  We were all done with the painting by Tuesday night but Scott had to install the new white shelves above the toilet and install the little towel ring by the sink.  We are still waiting to get the light fixture installed and that will be done tomorrow.  But I wanted to go ahead and show you the finished product.

Let's start out by looking at why my inspiration was.


This is the rug I found at Home Goods awhile back and this is in front of the vanity & then I have a smaller one in the tub/toilet area.  I love the way the blocks are placed and all the shades of purple with a little bit of gray.  Our dining room is a lot similar to this with the grays and the purples (not lavender walls).

Let's take a quick look at the before's:


So without further ado, here is the bathroom! :)


I added some personal touches in the room with two large pictures of my babies bathing (get it? We're in a bathroom?) :) I have a teeny little frame on the top shelf above the toilet of Scott & I when we were about 19 & 21.  I know, we look super young.  I will most likely change that picture and put something more "bathroom" in it, but we'll see.  Let me explain what I have on the counter top.  On the far left is a tumbler of Q-Tips & then right next to it is a little jar of cotton balls and little make-up remover puff thingys.  Then soap, then a tumbler of some sort that holds Liam's toothbrush & tooth paste & of course when we have guests, they can utilize it as well.  Then on the far right is a reed diffuser because let's face it...I have a little boy & little boys tend to smell after playing outside.  :)

The painting on the far right wall is something I bought yeeeeeeeeaaarrsss ago but never parted with.  I wanted to incorporate some browns & grays in the room to balance out the purple & not make it look to "feminine".

Well I hope you enjoy the room & once we get the light fixture installed I will post a new picture of the vanity area.  Have a good night!

~Kristine

Tuesday, July 24, 2012

Green Goddess Grilled Cheese - A Pinterest Recipe

I wanted to share with you guys an amazing recipe I tried last night.  It's a creative turn on a typical, boring grilled cheese & a lot better for you!  Scott & I normally don't eat meat (especially red meat) but we will have our occasional chicken & ground turkey.  But my goal this last week was to make a dinner every night with no meat, all veggies.  And I succeeded and made some awesome dinners, including this one.  The green goddess grilled cheese.  I have seen this recipe a lot on Pinterest so I decided to try it.  I found the recipe here.

Let's first look at the mess I made...Yes, I am a messy cook.

 
These are the ingredients that you will need: *This is to make one sandwich*

- 2 slices of bread (preferably a multi grain bread)
- Pesto (the link I attached has a recipe to make your own pesto. I bought mine)
- 2 slices of mozzarella cheese
- Crumbled goat cheese
- Baby spinach
- Slices of avocado

Pour a little olive oil in the skillet.  Spread the pesto on each slice of bread.  Place one piece of mozzarella cheese on the bread, then add the avocado on top.  Put some goat cheese on next, then add some spinach and top it off with another slice of mozzarella cheese.  Then place the other piece of bread on top and press down.  Put the sandwich on the skillet and let it brown, then flip it over and press down and let that side brown.  Take it off and cut in half (if you so choose) :)


YUM!  Look at all that green goodness.  I didn't know if I would like the goat cheese, but it gives it a creamy taste.  So delicious!  We ate it with some sweet potato fries!


So make this!  It was really easy and it was a crowd pleaser in my house.  We will make this again, for sure!

Oh. P.S.-The bathroom has been painted and now we are putting everything back.  I am hoping to get the photos all taken tomorrow and get it up here so ya'll can see :)

~Kristine

Monday, July 23, 2012

Guest Bathroom Makeover - Part 1

Hello everyone!  I hope everyone had a great weekend!  So sorry for the delay in posts :)  Having a wee little baby & a 3 year old is quite the challenge!  I'm sure a lot of you can understand.

A lot has changed in our home since I last posted.  I will be showing all the new updates within the next couple days.  But the first project I wanted to discuss was our guest bathroom/kids bathroom.  We've left it the exact same since we moved in.  Boring beige walls and all the nasty fixtures.  The ONLY change we made when we moved in was the faucet.  That old 1999 fixture had to go.  So we replaced that ASAP.  But the colors, the $1.00 towel bars and etc was all the same.  Until now.  So the first step - pick a paint color!  I love the shower curtain & the rugs that I have in there already.  I got them at Home Goods a while back & those are staying so I needed to pick a paint color that worked around the rugs.  Well if you didn't know, Sherwin Williams is having their semi-annual paint sale where all their paints & stains are 40% off!!  I know, right?!  Normally, we never go there because quite frankly, I think their paint is a little expensive.  HOWEVER, all their paint is non VOC & has amazing coverage.  So you get what you pay for.  Anyways, we decided to go with a light lavender color from HGTV.  Yes, HGTV has a paint line from SW (Wow, I sound like an endorsement for Sherwin Williams-I swear I'm not). :)  Here is the beautiful color we decided to go with.


Yes, it's the one with the arrows & smiley face & circle.  It's called Grape Mist.  This picture is pretty true to the color.  Well we got down to business this afternoon and started removing everything off the walls & all the crappy $1.00 towel bars & stuff & did some MAJOR spackling.

Yep, I'm getting my spackle on.  Pardon the no make-up :)

This is all pre-sanding, so it looks lumpy.  Don't worry ; I'll sand.
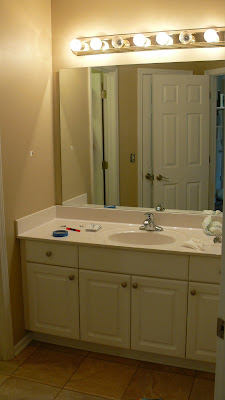
Here are some BEFORE pictures you might enjoy (well, probably not-this wall color is awful).


Ok, now here's the to do list.  I hope to have this all said & done by Wednesday.  We have already done part one.  Tape everywhere & remove everything & spackle.  Painting will come tonight once the babies are in bed.

Guest Bathroom To-Do List:

1.  Remove all hardware, tape & spackle
2.  Paint!
3.  Remove light fixture? (If I can find an inexpensive one at Home Depot)
4.  Get a new towel bar
5.  Hang two white shelves above the toilet (Already own shelves, need to get decorative brackets)
6.  Hang pictures, art, etc.

That should do it!  If anything else, I'll update later.  Stay tune for part two tomorrow!  Have a great night!

Oh, PS-I'm making another Pinterest recipe tonight.  I'll let you know how that goes too.

~Kristine

Sunday, March 25, 2012

A Pinterest Recipe

Hello everyone!

Wow, Sorry it's been so long since I have last posted.  Let me show you why...


Yes, I was having my little baby girl - Lola.  :)  She is such a precious and sweet little baby!  She was born on Sunday, January 29th at 6:48 a.m.  She was little - Only 5lbs 10oz!  And I was full term.  Scary delivery, but I'll chat about that on another post.  She is 8 weeks old today, so here is a more recent picture.


Ok, so enough about my cutie little baby! :)  The point of this post is to talk about a yummy little recipe I saw on Pinterest.  If you don't know what Pinterest is, then you have been living around a rock!  It's such an awesome website and you need to join if you haven't yet!

This recipe is called "No Bake Energy Bites" and I pinned it on Pinterest from this source.  Here are mine and the recipe is below.


Ingredients:

  • 1 cup oatmeal (the old school oats)
  • 1/2 cup chocolate chips
  • 1/2 cup peanut butter
  • 1/2 cup flax seed
  • 1/3 cup honey
  • 1 tsp vanilla
*It says to add coconut flakes, but I chose not to since I hate coconut, but that is something you can add!

Directions:

Mix all ingredients in a bowl and refrigerate for 30 minutes then simply roll into little balls.  Should make around 20 balls or so, depending on how big or small you roll them.  Keep them refrigerated and enjoy!


*Another side note - you don't have to use chocolate chips.  You can substitute those for anything.  Chopped walnuts, almonds or maybe dried cranberries.  Anything you want! :)


I hope you enjoy and try them out!  I have a few other projects up my sleeve that I have been working on and will be sharing very soon!

Kristine