background

Friday, April 29, 2011

Re-Stylin' some old canvas art

Happy Royal Wedding day!  Right?  No?  Don't care?  Well even if you didn't see it or care to watch it, Kate looked absolutely stunning!  No doubt about it.  So let me get back to what the post is supposed to be about and that is re-stylin' some old canvas art you have that you may just not really like anymore.  I have two pieces of canvas art that I bought at Old Time Pottery, probably 3 years ago that I have taken with me everywhere that I have moved.  They are recently placed in my kitchen.  Here:


I think they were like $6 a piece.  So I decided it was time to re-style them a little bit.  What better way then to wrap them with some beautiful fabric.  I went off to my favorite store, Hobs Lobs :)  I bought one yard @ $6.99 per yard at 30% off! Yeah buddy!  Our kitchen colors are greens, browns and pops of red in our center piece on our table, so I wanted to incorporate the same colors but maybe bring in a little blue or turquoise.

Another view of the where the pictures hang in the kitchen
 Just a few items needed.  Staple gun, fabric and scissors. Oh! And of course some old canvas art.


Place your picture, face down, on the fabric, also face down and cut about 1 inch around the picture.  Next you'll simply just staple the fabric into place on the back of the frame. And Voila!  You're done!


This is a view of the eat-in-kitchen and the new re-styled' canvas art hanging on the right

How simple, right??  And CHEAP!  That's the best word! :)  So go forth and re-style' my friends!  More to come on the little man's room soon!!

Thursday, April 21, 2011

Guest room - Re-styled!!

I am FINALLY done with the guest room project!!  I've actually been done with all the painting and decorating for a while, but I was waiting on a white goose-down comforter for the bed.  My mom was sending it to me to let me borrow for the whole summer!  Shout out to Mom's!  Thank you!!  It was also free of charge for me to use it... :)  Anyways, lets look at the before:

Boring....

More Boring...

More, More Boring...
As you can see, the room was lacking some color and was just kind of drab.  Well not anymore! Here is the AFTER:


LOVE the color!!  LOVE the lamps!!  Everything in here was a fun and super cheap find! We'll get into that more in a minute.  SO many fun DIY projects from the headboard to the "LOVE" art above the bed to the white mirrors on the wall.  This is by far my favorite room in the house, so far.  It is so colorful and just simple and pretty.  Here is a dresser that I got for FREE.  Yep, it was left here in the house by the previous owners.  They left it because it needed some work and they obviously didn't want to deal with it.  Score for me!  All it needed was some wood glue.  Done.  So here is the dresser with the DIY art project above it.


Matches the floors and everything.  I was thinking of painting it white, but once I left it here for a few days, it really grew on me.  It's staying as is!  Here are the super cute blue polka dot curtains I got at Ikea.


$12.99 for 2 panels!!  DEAL!  Most of the stuff in this room is either from Ikea or Old Time Pottery.  Those 2 beautiful lamps are from OTP and the BRIGHT yellow rugs are from Ikea, seen here:


Those light blue night stands are also from Ikea!  So let's break down the costs below.

  1. Paint: $30.00
  2. 2 Rugs: $30.00
  3. 2 Lamps: $22.98
  4. DIY Art:  $5.97
  5. Mirrors: FREE (Already owned, just painted white)
  6. Comforter:  FREE (Thanks Moms!) 
  7. Dresser:  FREE (Thanks previous homeowners!)
  8. 2 Night Tables: $12.00 ($6.00 a piece!)
  9. Curtains: $12.00
  10. Headboard Materials: $17.00
GRAND TOTAL: $129.95!!  For a whole room???  Not to shabby if I do say so myself!  I was really trying to stay at $100, but I went over just a tad.  Not to bad though.  So there we have it!  The guest room has been re-styled!  I am posting pictures of the office today or tomorrow too.  Yes, I've been done a while, but there were a few more things I needed to re-touch before I showed everyone!

Thanks for reading Re-Stylin' and I hope you enjoy the room!

PS-All the DIY projects for this room can be seen under the link "Projects" above.  Go take a look!

Friday, April 15, 2011

DIY Headboard

"Y'all ready for this??" (Que JOCK JAMS! and que the Kingwood HS Band circa 2000) :)  Yes, I was in band in middle and high school, but that's beside the point...Make your own headboard!  Super easy and it really creates a focal point in any room.  I am making this headboard for the guest room that is being re-styled as we speak.  Once this baby is done, all I will have to do is hang up the fabric art and the free printable art project that was done earlier in the week.  I also painted some mirrors white that are also from Ikea for $2.99 a piece!  I painted 6 of them and they will be hung up on the wall too.

Ok, back to the DIY headboard.  I'm sure you have seen a few different ways to do it, I don't know, maybe you haven't, but I am going to show you how to make one on a $20 budget!  That's right, folks.  You got Mrs. Cheaperson talking here and I didn't have much left to spend on this last project for the room.

Here are the few things that you will need:
  1. Fabric
  2. Quilting batting
  3. 2 pieces of 1x2x8 wood
  4. Staple gun
  5. 1 box of corner brackets
SO here's a little story:  Went to Joann Fabrics and found the fabric I wanted.  Since this is the guest room, I didn't need something super luxurious, plus I had to stay in budget!  I found this beautiful green fabric that will go PERFECT in the room and it was only $3.99 a yard (And you need 3 yards).  Deal!! But then I got a discount because it was the end of the roll, so it was only $3.58! DOUBLE DEAL!  Then the quilting batting was on sale for $7.00.  Then I went to Lowe's and looked at the plywood and the cheapest one I could find was $11! Nope, need something cheaper.  So I found these 1x2x8 boards and they were like 92 inches long and I needed 58 inches.  So Lowe's will give you your first 2 cuts for free!  Well I needed 2 pieces of wood and guess how much they cost a piece??  $.98!!  So a total of: $2.08 with tax.  Since I am making a queen headboard, you need them to cut it down to about 58 inches in length.  When he cut the 92 inch piece of wood, he gave me the left over wood.  You will end up using those left over pieces for the side pieces of the headboard!! Whoo Hoo!!

First step is to take the 4 pieces of wood and, using your brackets, make the rectangular shape of the headboard.


Once you have the corner brackets in place and the headboard is now formed, the next step is to lay out your quilting batting on the floor and lay the headboard frame on top of it.  Cut the batting around the frame leaving about 1 to 1 1/2 inches on each side.


Then you'll take your staple gun and pull the batting taut and staple into the wood.


Once your done, it'll look like this:


Now I want to mention you can use as much padding as you want and make it nice and thick if you want.  Like I said, this is just the guest room, more for the look :)  Next step is to lay your fabric on the floor and then lay the headboard frame on top of it and repeat the same exact step as above.  Make sure you pull the fabric nice and tight.  Make sure you run the iron over the fabric before putting it into place.  You don't want wrinkles on your new headboard, do you?! :)

Once you finish that step, this is what you got:


Here it is on the wall:


LOVE IT!!  Especially with the colors of the wall....**Sigh** In love!  Like I said earlier, all I have to do is put everything else into place and we will have the big reveal SOON!! 

TOTAL COST OF HEADBOARD:

  • Fabric = $10.74
  • Batting = $7.00
  • Wood = $2.08
GRAND TOTAL = $19.82!!!

Thanks again for reading Re-Stylin'! 

Thursday, April 14, 2011

Fun project with extra fabric!

Got some extra fabric laying around??  Well here is a really cute and CHEAP idea to dress up some of your picture frames.  Here is what we are making:


Let's use that extra fabric and wrap it around some cheap frame mats!  Cute idea, huh?? :)  With just a few simple things, you can make your own! 

You'll need:

  1. Extra fabric (Free!)
  2. 8x10 frame mats ($2.00 a piece @ Wal Mart) or whatever size you want - this frames a 5x7 picture
  3. Scissors & an exacto-knife
  4. Tape
  5. Frames
The first thing is to lay your fabric color side down then lay your mat upside down on top of it.  Cut the fabric around the frame just leaving enough to tape it to the mat.  This is what you'll have after you finish cutting:


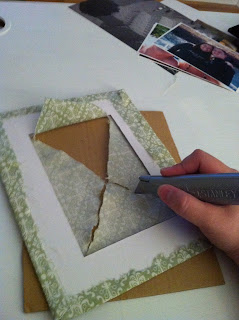
Next you'll just start taping the fabric to the mat.  You could you some spray adhesive, but I didn't have any, so tape it is!! :)  After you tape it, you will make a little hole in the center of the fabric using your exacto-knife.  Then you'll take the exacto-knife and from the corner, make a cut down to the center hole.  Do this on all 4 sides.


After you make those cuts, take your scissors and cut the top part of the "triangle" seen above and then simply just tape it to the mat.


You are all done!!  This is what you have now!  You don't have to use honeymoon pictures, but that's what I chose! :) Kidding!  


I am going to make one more and these will be hung up in our newly re-done guest room!  Which by the way I was able to paint the other day.  Liam was able to nap for awhile!  Yay for me!!  So paint has been done and it looks awesome!!  Decorating and putting everything together tomorrow.  Enjoy your newly updated photos!!

Thanks for reading Re-Stylin'.! :)

Tuesday, April 12, 2011

FREE Printable Art

Well who doesn't like the word "FREE"?  I found this awesome website this morning where you can print free art and graphics.  It's 100% legal and this blogger has tons of options to choose from.  I chose the word "LOVE" to print out in 6 different ways.  Also, I printed them out on 5x7 glossy photo paper just to look a little bit more fancy.  If you do not have a photo printer, no problem!  Just print them on regular ole' paper. 

Since I am re-stylin' my guest room I needed some art to display in the room.  I made a trip to Ikea yesterday and bought some of the essentials I needed for the room.  Well I picked up these:

These were $1.99 for TWO frames in one pack.  So I got 3 packs (for you math people, that = 6 frames total). :)  All I did was print the art I wanted, seen here:


I then laid them out on the desk, strategically of course


Then put them in their new homes! :)


See??  They look great and the best part is, they were free!  I have purchased everything I needed (I think) for the new guest room.  Today I would like to start painting, but I am dealing with this very upset child, seen below:


Not sure why he is so grumpy today!  Painting may not happen if he won't cooperate! :)  Maybe during nap time...Anywhoo, go visit this awesome site and print yourself some new FREE art!!

Thanks for reading!

Sunday, April 10, 2011

Above the head board art

Lately I have been obsessed with Craigslist.org.  I have the app on my phone and I am constantly looking to see what's been posted and what kind of treasures I can find and change!  Well, I found a head board that is faux leather and a rich brown color that goes along with our current furniture.  He was asking $75 and I paid $70! Whoop! :)  $5 off is a good deal, right?? Anyways, I am totally in love with it!!  It is so pretty and it's what I've been looking for.  A big thanks to my hubby for working all night then coming home at 7:30 a.m. and staying awake until 12 to watch Liam so I could go pick it up. :)  Good man!

The past couple days I have really looked around for something to put over our beautiful head board.  Done some research to see what other people have and finally decided on DIY art (duh, what else would I do?!).  I talked to my bestest friend Sarah, and she was telling me about her friend who bought a couple cheap canvas's and painted them with some stripes (using painters tape).  What a good idea! Stripes are awesome, but not really for the theme of our room.  So I decided I wanted to use 4 canvas' and luckily I already had 2.  Off to Hobby Lobby I go with my little mans. :)  I got a pack of 2 canvas's for $7.99!  Whooo!!  I decided to put some of the vinyl art on the canvas's.  I was also going to paint them the lightest shade of green that is also in our room (score, free paint!).  Anywhooo, looked at all the vinyl art they had and ultimately thought we need something circular to break up all the straight edges.  So I got these beautiful flower looking thingy's in grey-ish, silver-ish and black.  Here they are:


I think they are super cute!  These by the way were only $10!  They are usually $20 but since Hobby Lobby is AWESOME, they were 50% off!  Can't beat that.

Here are the simple steps:

  1. Paint your canvas any color you want
  2. Let them dry for a little bit (you don't have to wait too long since canvas's dry really quick)
  3. Now, the FUN part!  Getting these little sticky guys on to your canvas!  
Just press firmly and they will stick just fine.  Here was my problem...


These little guys would stick together!!  Ugh, it was so annoying.  But after a little time and patience... I got it to work! :) Here is what it ended up looking like.  Now remember the color I chose is kind of hard to see with the camera, but its a very light green called "Celery Ice".


Here they are all nice and hung up above our head board:


So.....What do you think??  I am loving it! :)  It really gives the wall some length and really draws your eye to the bed, which is the whole point since I LOVE our new head board.  So there you have it! 

$7.99 - 2 canvas's
$10.00 - Vinyl wall art
                                       
$17.99 TOTAL!

For less then $20 you get a beautiful above the head board art piece.  Thanks for reading again!

Next Re-Stylin' Re-do: Our guest room

On to the next big project!  I know, I haven't posted pictures of the office...Sorry!  I am done except for the shelves.  They are going to be hung soon, I promise! 

I am moving on in my head to the next room, the guest room.  This room will eventually be a nursery, but that is not until way in the future, so for now, let's get creative in this guest room.  This is the main guest room (we have a few..) so I really want it to be bold and fun and comfortable.  Here is the space:

What you see when you walk in and look left
What you see when you walk in and look right

So, a good size room, right??  Not to big but it's a perfect guest room.  Are you ready to see the color I am choosing for the walls?  You can kind of see it blobbed up on the wall next to the window, but here's a better shot:


BOLD.  LOVE it!  I am going to dress this room up with some fun and BRIGHT colors!  Yellows and greens and turquoise, oh my!!  It will be beautiful.  Ok, so here is the tricky part...I only have $100 to do it!  Can I do it??  I sure hope so!  First stop?  IKEA!  I already have plans to buy the curtains there and some bold pillowcases, all for under $20!  Watch me! :)  Luckily, my mother is AWESOME and is letting me borrow her plain white goose down comforter for the summer since goose down is very light weight and we know how hot it gets down here in the ATL.  So, SCORE!  A free plain white comforter.  Gives me more room to really dress up the space with lots of color. 

More to come on this re-stylin' re-do! :)


Wednesday, April 6, 2011

Ain't Nuthin' But A "g." Thang!

So I got another fun little decoration DIY project that only costs .55!!  That's right!  Here is what we are creating:

Cute, huh??  Well it was really simple.  I have been looking for a big "G" for our room obviously to symbolize our last name, Graham.  I just really like the way it looks in a bedroom.  I want to hang this in our bedroom above our bed/head board.

So this is what you need:
  1. Color card stock (any color of your liking) - .55 from Hobby Lobby
  2. A frame - FREE (already owned, but read below for the price if you want one)
  3. Scissors
  4. A computer! :)
I found this "g" from Google. I copied and pasted it into a Word document and adjusted it to my liking.  I then printed it out on the card stock and then traced the paper that comes in the frame onto the card stock, then cut it out.

 
Then its nothing then putting it into your frame!


By the way: These frames are from Ikea and this one in particular is a 5x7 for $4.99 a piece!  Yeaaaa buddy!!  I have a ton of these!  Perfect for hanging and displaying! ;)

This is the final product: 


I plan on putting this frame in this:


This is also from Ikea!  These are $4.99 as well.  They are 4 pieces of wood that you screw together and they are called "Fabric Stretchers".  You usually stretch fabric over it and display it as art (which I've done before as well).  Well you can also use it as a molding type of display.  Which I also love to do!  It just gives the piece of art you want to display a little something else. :)

I painted it a nice gray color and I am waiting for it to dry as I type.  Once I hang it up, I will post a picture of the whole finished product above our bed.  Yay!

Thanks again for reading another post on Re-Stylin'.

P.S. ALMOST done with the office.  Everything is in place and painted.  Just hanging up the FREE shelves.  Tell you more later. :)